Logos takes a slightly different approach to morphological markup that has both advantages and disadvantages as compared to BibleWorks7. The Help manual provides a description of "Highlighting and Annotation," but it is not sufficient to explain how to work with the highlighting very well. These Logos blog posts will provide a better example of how it works and show you some of the possibilities.
- Using Libronix as a Teaching Aid in Introductory Greek Courses
- Visual Rivers and Verb Filters
- Highlighting English Based on Greek Morphology
- Who Cares about Participles? I Do!
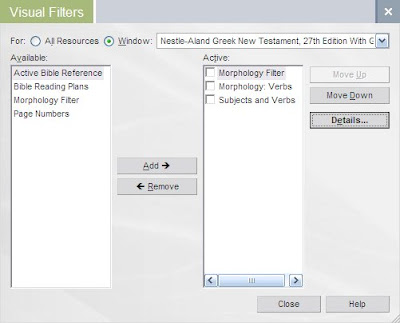
As you can see in the video, I end up thinking of Logos markup as working in four parts. First, there is the Visual Filters dialog (accessible via View on the menu). Note that you can activate features for "All Resources" or for a particular window. You have to add Available markups to the Active side, and then you can click on Details to modify or create the color sets. (You will see that I have started creating additional morphology sets.)
 Second, then, is the Visual Filter Details window. Where BibleWorks required that you first conduct a search in order to create a new category, I like how Logos allows you to specify morphological features in the dialogue box.
 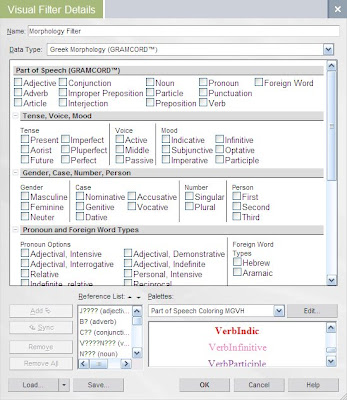 Be sure to follow this order of creating a new category:
- If you are creating a new scheme, type the name at the top of the window and save it with that new name.
- If you are simply adding a new element to an existing scheme, click on the morphological features you want, then make sure you have the palette you want, then click on the particular style, then click on Add.
- If you add more than one style, they seemed to get mixed up for me. In this case, click on the markup style, click on the Reference list item that it goes with, then click on Sync. Repeat as necessary.
- If you need a new style, you need to click on Edit, and this will bring up...
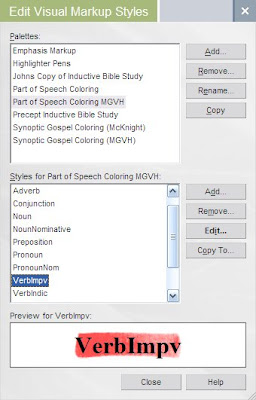 In the bottom half of the window you will need to click on Edit to change or else Add for a new style. That will a fourth dialogue: Add Palette Style.
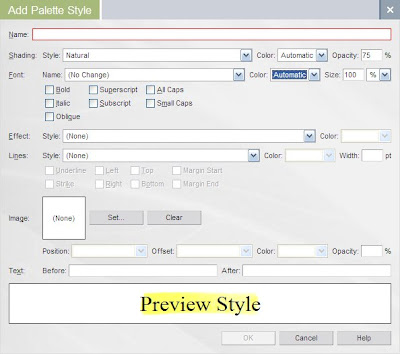 There is quite an incredible range of options one has for marking up the text. I find the "Natural" shading to be very nice, and one can also change opacity and add a variety of other text effects.
So, with all my morphological filters activated, my Mark 1 text looks like this:
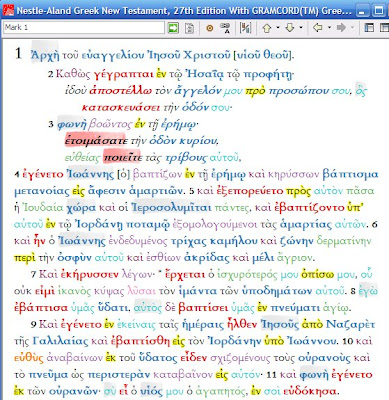
Some observations:
- I don't think it is just my computer, but it can be a slow process waiting for the markups to be activated. (I.e., don't click more than once to activate a scheme, or you will find that you have turned it off just when it finally came on.)
- It is not easy to activate only certain morphological features individually. For example, say I wanted to highlight all the nominative pro/nouns and indicative verbs in order to more easily see subject / verb constructions. I could start with my full set of filters I created and delete some and modify some and be sure to rename it with a new name and then activate it. This will take some time... Of course, once I have the collection of markups I want, and if I have saved them, I can easily turn them back on later. (In contrast, BibleWorks7 lets me turn on/off morphological features individually.)
- I do find the markups to be more attractive in Logos than the simpler set of markups in BibleWorks7.
- Like BW7, and as one would expect, the coding schemes one creates only apply to a single text/version.
- Activating a scheme one has created is a bit convoluted. One cannot necessarily turn on a set from the Visual Filters dialogue. I.e., to load a set if it is not appearing, one has to add the proper Available style type such as Morphological Filter, then click on Details to open the Visual Filter Details dialogue, and then click on Load to get the file.
- The biggest drawback to the implementation of the markups in Logos is that they do not work in the Parallel Passages and Harmonies. (In BibleWorks7, one could have the markups active in their Synopsis window to make easy comparison between the Gospels.)
- It is much easier in Logos to highlight by hand, i.e., highlighting text apart from automatic morphological coding. There is a highlighting button in the toolbar, and the dropdown menu lets one easily choose which style to apply. In addition, by going View > Visual Markup Styles, one can quickly see all the styles for each particular palette.
- THIS FILE should be saved in your My Documents/Libronix DLS/VisualMarkupPalettes directory.
- THIS ZIP FILE should be saved in your My Documents/Libronix DLS/VisualFilters/MorphologyFilters directory. (You may need to create this subdirectory.)

No comments:
Post a Comment