Thursday, July 25, 2013

BibleMap App

Introducing the BibleMap App…a Must Have for Everyday Bible Study | Parchment and Pen
Only available for iOS for now but promised for Android in the fall. Looks interesting and only 99cents at iTunes.
If you are working on the web, be sure to check out Bible Geocoding at OpenBible.info.

Tyndale Launches Online STEP Bible Study Resource

Tyndale House Cambridge Launches Beta-version of Scripture Tools for Every Person (STEP), a new free Bible study resource


Tyndale just released their STEP online Bible resource. From their announcement:
Today the STEP development team of Tyndale House Cambridge launched the Beta-test version of a new free Bible study resource at www.StepBible.org.

STEP software is designed especially for teachers and preachers who don’t have access to resources such as Tyndale House Library, which specialises in the biblical text, interpretation, languages and biblical historical background and is a leading research institution for Biblical Studies.

The web-based program, which will soon also be downloadable for PCs and Macs, will aid users who lack resources, or who have to rely only on smartphones or outmoded computers.
Be sure to read the announcement page for more info about this project and how it developed. You will see that this is a product of many volunteers and contributors, and the primary focus is to make it downloadable for persons in the Majority World. "Ten language interfaces are available and another 83 are ready for volunteers to work on."
Here are some of my initial impressions of this online beta version.

TEXTS:
Ancient texts available include:
  • Hebrew: Leningrad, Aleppo - All have vocabulary encoded and some have extra grammatical coding and interlinear capability.
  • Samaritan Pentateuch: with Hebrew MT, with MT & DSS, with DSS, (and in KJV English)
  • LXX Greek: Orthodox LXX, Rahlf's LXX (and Brenton's English)
  • NT Greek: Orthodox NT, Byzantine, Elzevir TR, TR, Tregelles, SBLGNT, Westcott-Hort w/ NA & UBS variants
  • Syriac NT Peshitta: in Syriac and with Etheridge and Murdoch English translations
  • Latin: Jerome's Vulgate, Sixti, Clementine, (and Douay-Rheims English)
Modern texts include a wide variety of non-English versions, but among the English versions are: AKJV, ASV, BBE, ESV, JPS (OT), KJV with Apocrypha, Lexham, Tyndale, WEB, and Young's. Of these, the KJV and ESV are most useful because they are capable of the 'sympathetic' highlighting of Greek or Hebrew, and the KJV additionally has grammatical information for every word.

DISPLAY: It took me a while to figure out how to manage the display features. I ended up choosing a two-panel display and keeping the right in sync with the left. (The sync did not work well for me.) With most panes, you also have the option of choosing a Basic, Intermediate, or Advanced view. You can set up a display like I have pictured above. Note the capability of sympathetic highlighting. Clicking on a word in any language will popup original language information on that word. With the Advanced view option, you can set up text to be viewed as interlinear or interleaved. Cf. the graphic below. Note that hovering your mouse over a highlighted chapter:verse reference will pop up vocabulary data for every word in that verse. Using the Advanced option for that popup will not only give the basic Strong's information but also include LSJ data as well. With the KJV, you can also enable grammatical coding. I could not figure out its coloring scheme, but there is full English grammatical analysis of every word provided.
Pointed Hebrew and marked Greek did display nicely, but the text critical marks of the SBLGNT did not show up correctly.
Navigation to texts and selection of options is intuitive, but a bit clunky. (E.g., you can type a passage reference to get there directly, but using the dropdown boxes takes some clicking and scrolling.)
I did try viewing the web page on a smartphone browser, but it was a frustrating experience. The menu bars and center column take up quite a bit of screen room leaving little space for the text.


SEARCH: Searches can be conducted from the text (click on a word and in the popup, you have the option of searching for the same word or all related words) or from a search pane. You can conduct your usual passage, text, or subject searches, but you can also conduct Greek/Hebrew searches using Unicode. Doing a Greek search, you can choose to search multiple versions, so that means you can search the LXX and Greek NT simultaneously. I was getting inconsistent results determining whether the search ignores diacritical marks. There are no diacriticals in the LXX or BYZ versions (so no problems), but STEP can sometimes search the SBLGNT--which does have diacritical marks--using unmarked Unicode Greek entries. With the Text Search, you cannot search for Greek lemmas, so it helps to use an asterisk wild character to get results. The Advanced Text Search in Advanced mode allows for English double queries with something like a 'fuzzy' search capability. (E.g., a search for "Include spellings similar to run" returns hits with run, sun, ran, runs, Nun... Perhaps the most interesting and useful capability is the Original Word Search. You can search for "words meaning" and start typing an English word. A drop down list of Greek and Hebrew words will appear, and you can choose from the list or choose all. Note my example of a search for "test" and the Hebrew/Greek results it displays. The results can be grouped by Scripture order, lemma, or original spelling. Very nice! (Note that all of this searching capability seems to be enabled by use of Strong's numbers and definitions.)


SUMMARY: There are still some beta-version issues to be worked out, but this is a useful web resource. I found the display to be a bit cumbersome, but it has some nice features to display multiple versions and languages. One of the best features is the ability to do an original language word search from the English and discover all sorts of related words. It's great that this is available online, but remember that it is intended to be a downloadable resource, especially for those in the Majority World who might not be able to afford or have access to a major software program. For now, STEP is mostly restricted to biblical texts with no associated resources other than lexical and grammatical info. For an online Bible resource, I still think that the NET Bible Study Environment offers a better selection of texts, especially the NET Bible with all its notes. The interface is a bit cleaner and does not use popup windows. There are many more 'social' options on the NET Bible site, but it doesn't have the search capabilities of the STEP Bible site.

Friday, July 19, 2013

Textal, A Free SmartPhone App for Text Analysis & Other Concordance Programs

This notice regarding Textal comes from ProfHacker on The Chronicle of Higher Education. It is only available for iOS, so I am unable to test it, but it looks interesting as a textual analysis tool.
First Look: Textal, A Free SmartPhone App for Text Analysis - ProfHacker - The Chronicle of Higher Education
More info on their website.
There have been other textual analysis or concordance type tools around for a while. (Online, try Text Analyzer or Textalyser or see this list.)
Accordance, BibleWorks, and Logos can all create concordances of texts in their databases. I also know that Logos can create a Wordle type of word analysis diagram using the Passage Analysis tool. (Expand the "Interesting Words" entry and choose either English or Greek.)


Friday, July 12, 2013

Working with Hebrew, Greek, and English in the MT and LXX - Logos5

In the previous post, I noted how David Lang was writing about "Using the MT-LXX Parallel" in Accordance. Since I am a BibleWorks9 and Logos5 user, I wanted to see how they handle the tasks Lang is describing. That previous post showed what to do in BibleWorks9. This post will deal with the procedures and capabilities in Logos5. Here's what we want to do:
  • Show how to set up the Hebrew MT and the Greek LXX with English versions so that hovering over a Hebrew or Greek word will highlight the English word. The example used is in Genesis 1.1 of שָּׁמַיִם and οὐρανὸν.
  • See the connection between the Hebrew and Greek, using Tov's "MT-LXX Parallel" tool. This tool matches up each word in the Hebrew with the word(s) used to translate it (or not!) in the LXX.
  • "Find every place where the LXX translates the Hebrew word tselem by some form of the word eikon." (This is the word usually translated in Genesis 1.26 with "image.")

Logos 5

The graphic below shows just how easily and excellently Logos shows the relationship between the Hebrew MT, the Greek LXX, and the English translations. All of this works because of Logos' implementation of reverse interlinears. (Note: I'm using the Windows version. I don't know how similarly it works on a Mac. For more info on Logos interlinears, check the Logos Wiki.)
  • For the Hebrew, use either the Lexham Hebrew Bible, the Lexham Hebrew-English Interlinear Bible, the BHS SESB, BHS Westminster 4.2 Morphology, Hebrew Bible: Andersen-Forbes, or the BHS WIVU.
  • For the Greek, use either Swete's Greek-Hebrew Reverse Interlinear Septuagint or the Logos LXX. (To see the reverse interlinear at work, click on the Interlinear icon at the top of the tab. It looks like a small box with lines at the bottom. It will open the interlinear data at the bottom of the tab. Now when you click on a Greek word, it will show you the underlying Hebrew.)
  • For English, you can use KJV, ESV, NASB, NIV, NKJV, Lexham English Bible, or NRSV. (The interlinear display works similarly to the Greek.)
Here's what you do:
  • Open one of each of those Bible, set them up in columns or rows as desired
  • Synchronize them (click on the book and choose the same link set for each; I'm using "A" which you can see in my graphic)
  • If not by default, click on the Visual Filter icon (the intersecting color circles at the top of the tab) and make sure Sympathetic Highlighting is checked
  • Personally, I also dock the Information window which you can see in the lower left
  • Left click on any word in any language, and the Info window will show the word's analysis, what it is translating, or how it is translated
  • Right click on any word in any version, and the word will be shaded 'sympathetically' in the other versions.

Logos does have Tov's Parallel Hebrew-Greek, as you can see below, but frankly, it's not of much use. It's not morphologically tagged, and everything you would want it to do can be better accomplished with the reverse interlinear resources and the Bible Word Studies which I will describe in a moment.


Finally, the last task... Again, here is the question posed: "Find every place where the LXX translates the Hebrew word tselem by some form of the word eikon." There are a few  ways to get at this.
1) Bible Word Study:
  • Go to Genesis 1.26 again, right-click on צלמ, but this time choose to do a Bible Word Study.
  • If it's not expanded, click on Translation. With the  mouse on the Translation line, click on Settings on the right, and choose Logos LXX. (For some reason, LXX Swete does not work.)
  • Now click on צלמ in the middle of the circle, and it will generate all the LXX texts. Here's what you get:
  • A couple issues... First, we only have the Hebrew and not the Aramaic results. Second, you will see that Greek forms, not lemmas, are given. (It appears as if this information is being drawn from the non-morph tagged Tov.)
  • But do note the extra information embedded here. Let the mouse hover any of the colored wheel parts, and, as the graphic below shows, a popup will show all the other Hebrew forms that this Greek form is translating.
2) Simple Word Search
  • I could start with a search for צלמ but we'll jump right to Genesis 1.26 in the Hebrew where initiated the question.
  • I could right-click on the Hebrew word, but note that I can also right-click on "image" in the English version as well.
  • As you can see in the graphic below, I want to choose the correct lemma, and then click on "Search this resource"
  • If you run that search yourself, you will see a problem that I identified in the previous post. Logos, like BibleWorks, makes a distinction between the Hebrew and Aramaic texts of the OT. Our search only found the Hebrew instances of צלמ . You can see in the graphic below that I actually created an OR search and added the Aramaic form.
    • You can also see that I floated the results window (CTRL-F11).
    • Click on Verses
    • If a second column is not already visible, click on Add a Version and enter "Logos LXX"

  • Now you can see all the instances of צלמ highlighted and see all the Greek words translating it highlighted as well.
  • The search works fine, but it will take a little bit of scanning to see where εικων is translating צלמ or not. There is a better way!
3) Sophisticated Word Search
  • Using the results of the word search you just did, instead of looking for All Bible Text in All Passages in Lexham Hebrew Bible, click on that last term, and change it to Logos LXX = Septuagint with Logos Morphology. Yes, it seems odd to be looking for Hebrew and Aramaic roots in the Greek LXX, but the reverse interlinear coding can handle it.
  • When the results come up, click on Analysis.
  • Now, as it says, "Drag a column here to group by that column" - So, choose Lemma (Greek) and drag it there. Here's what you get:
  • Note that this is the info we want! (If you right-click on the little down arrow next to the Greek lemma, you can choose to expand/collapse the levels as I've done to make the graphic smaller.)
  • You still may need to do a little sorting. (E.g., the 3 instances of "--" are actually coding issues and are included properly in the other hits.
But, there is yet a BEST way
4) More Sophisticated Word Search
  • Don't want to sort through results? Do you exactly and only want to answer the posed question: "Find every place where the LXX translates the Hebrew word tselem by some form of the word eikon." Here's what you do.
  • Using our results of the previous search, and still using All Bible Text in All Passages in Septuagint with Logos Morphology, use this in the search command line:
    (<Lemma = lbs/he/צֶ֫לֶם:1>,<Lemma = lbs/arc/צְלֵם>) ANDEQUALS <Lemma = lbs/el/εἰκών> (If you see &lt and &gt here, those are supposed to open and close angle brackets.)
  • Note that I've grouped the Hebrew and Aramaic terms in parentheses, but also note that you cannot use an OR to link them. Use the comma instead.
  • The ANDEQUALS now is functioning to look at all instances of צלם in either the Hebrew and Aramaic when they are translated in the LXX with εικων.
  • I can drag away the Lemma (Greek) organizer, and here's the result
  • Perfect!
Comments:
  • Most of your searches like this won't be so tricky if you're not worried about getting both Hebrew and Aramaic.
  • Note that you can also work this somewhat in reverse. I.e., you can search for a Greek lemma in the LXX and then use the Analysis to organize your results by the Hebrew (or Aramaic) lemma.
  • The tricky part in all of this when using Logos is that you need to get the right Hebrew lemmas and the Greek requires proper diacriticals. My solution is to do a search on a word I want by right-clicking on the word and then copy/paste the search coding to reuse it. Also, always be sure to select the options that Logos offers rather than trying to type the whole thing yourself. (This applies to Greek/Hebrew as well as to resources.) You'll still find that sometimes you can type using g:... or h:... to start getting Greek or Hebrew results. Sometimes you will need to switch your keyboard to Greek or Hebrew.
  • My biggest complaint? What if I want to save the list of verses generated by my search? Logos offers no way to generate a condensed listing. (See the list I was able to generate with BibleWorks in the previous post.) Logos does have Print/Export options. It also can generate a "Passage List," but even in its "compact" form, it still gives each verse as its own separate entry/line and doesn't condense them. I.e., I want this:  Gen 1:26, 27; 5:3; 9:6; 2Ki 11:18; Psa 39:7; 73:20; Eze 7:20; 16:17; 23:14; Dan 2:31, 31, 34, 35; 3:1, 2, 3, 5, 7, 10, 12, 14, 15, 18. But the best Logos can do is give me this:

Logos 5 Overall

  • CONS:
    • You have to keep track of which resources are capable of which search possibilities
    • Entering the proper Greek or Hebrew or Aramaic can be tricky
    • Logos cannot generate condensed verse lists
  • PROS:
    • Logos is extremely powerful and flexible in the tools it offers, all in an attractive and (mostly) intuitive package
    • Logos has done a great job of implementing their reverse interlinears
    • The Sympathetic Highlighting which can connect Hebrew, Greek, and English is wonderful!
    • The Bible Word Study offers helpful perspectives on the connections between the Hebrew and Greek
    • It's possible to construct sophisticated searches that provide good visual results as well as offering further analytical and organizational possibilities
If I've missed something with Logos, be sure to let me know! David Lang has promised further work in this field, so I'll try to keep tabs on what he's doing with Accordance.

Working with Hebrew, Greek, and English in the MT and LXX - BibleWorks9 (and Logos5)

David Lang is writing about "Using the MT-LXX Parallel" in Accordance. If you use Accordance, you definitely want to check it out.

  • First, Lang shows how Accordance has linked the Hebrew MT and the Greek LXX with English versions so that hovering over a Hebrew or Greek word will highlight the English word. He uses the example in Genesis 1.1 of שָּׁמַיִם and οὐρανὸν. The problem, however, is that though you can see the relationship of Hebrew>English and Greek>English, you cannot see the relationship between the Hebrew and Greek
  • To see the connection between the Hebrew and Greek, Lang shows how to use the "MT-LXX Parallel" tool. (I'm assuming this is Tov's work or one similar to it.) This tool matches up each word in the Hebrew with the word(s) used to translate it (or not!) in the LXX.
  • Since the Hebrew is not tagged in that resource, Lang then shows how to use a MERGE command to handle searches like: "Find every place where the LXX translates the Hebrew word tselem by some form of the word eikon." (This is the word usually translated in Genesis 1.26 with "image.")
Very helpful! Since I am a BibleWorks9 and Logos5 user, I wanted to see how they handle the tasks Lang is describing.

BibleWorks9

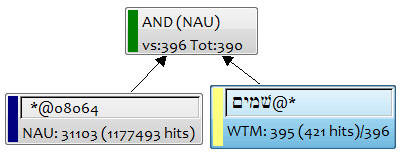
As an example, how is שָּׁמַיִם translated in the LXX and English versions? There is no easy way to see this visually in BibleWorks. The closest option I can think of is to find that the Hebrew word is assigned 08064 in Strong's. You could then use the Graphical Search Engine and search for this:

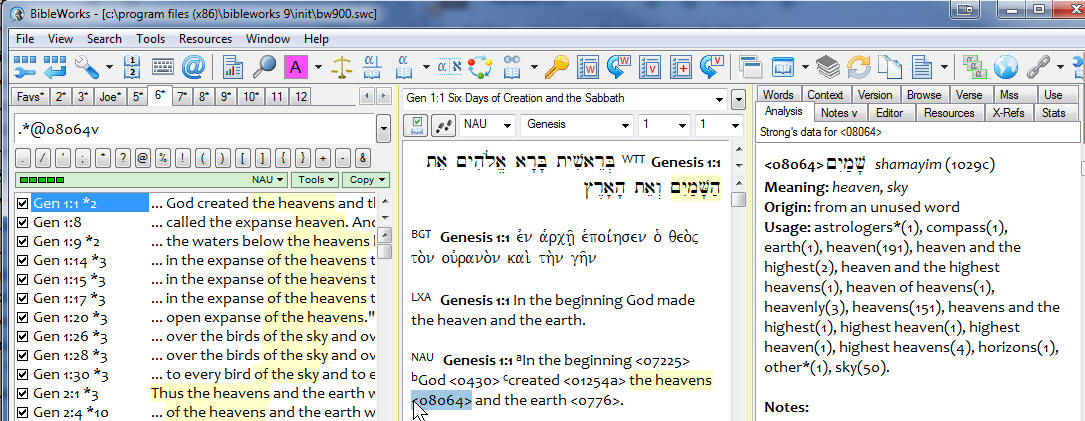
Run the search, and you will see this in the results:

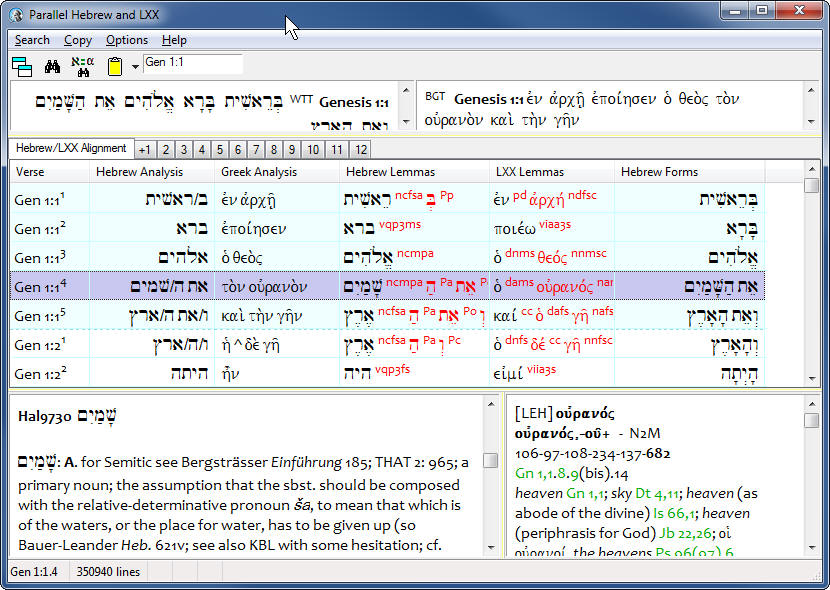
This does let you see both words highlighted, but it only works with the MT and either the KJV or NASB (the only versions with Strong's coding). When hovering the mouse over the Strong's number, you can also see in the Analysis tab the usage statistics. Like Accordance, this kind of matched visual highlighting will not work for Hebrew MT and Greek LXX. So, similarly, BW9 offers Tov's Parallel Hebrew and LXX. (Click on the little icon with the Greek alpha and Hebrew aleph or find it under the Resources in the menu line.) Doing so will give you this:

One thing that should be noted here is that both the Hebrew and Greek are morphologically tagged. This will make it easier to answer Lang's question, "Find every place where the LXX translates the Hebrew word tselem by some form of the word eikon."
There are a number of ways to do this in BibleWorks.

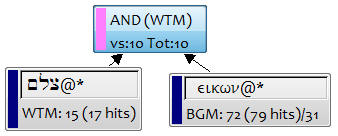
  1. You could use the Graphical Search engine and conduct a search like this:

    In .08 seconds it will generate the 11 hits that match. Hmmm.... Lang came up with 26 or so hits. What's going on? It turns out that Tov's Parallel Hebrew-Greek does not distinguish between the Hebrew and Aramaic parts of the OT, but BibleWorks does separate them. And there a whole bunch of "images" in the Aramaic parts of Daniel! So, yourhttp://www.scrollandscreen.com/biblestudyresources/http://www.scrollandscreen.com/biblestudyresources/ Graphical Search engine query needs to look like this:

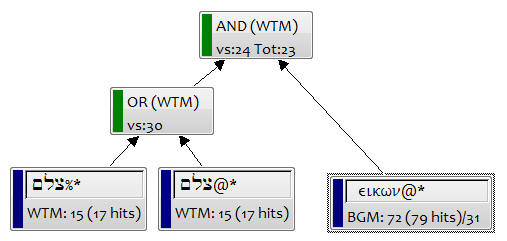
    (Note that the percentage sign % following the root indicates Aramaic and the at@ sign indicates Hebrew. If you want the QF file of this search, HERE it is.) Now I get the 30 hits in 23 verses in 0.14 seconds. This is good, but... it's not necessarily what you want. It's actually searching for verses where the Hebrew/Aramaic word appears and the Greek word also appears. It does not necessarily mean that the Greek is translating that particular Hebrew word.
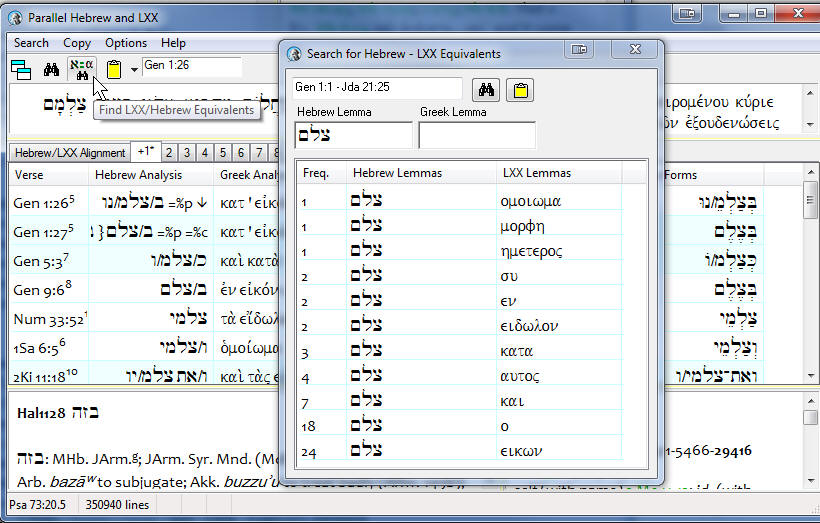
  2. Another way you might answer our question is by using Tov's Parallel again and take advantage of BW's morphological tagging of it. Click on the little binoculars with the א=α above it. When it opens, you can type in the Hebrew root, start the search and you will get this:

    This is a good way to look at all the ways that a Hebrew root is rendered in Greek (or, conversely, how a Greek lemma is rendering the Hebrew), but you also see that the results will need some closer inspection. (You see that the article or conjunctions or prepositions are sometimes listed. This is an issue w/ how Tov categorized things.)
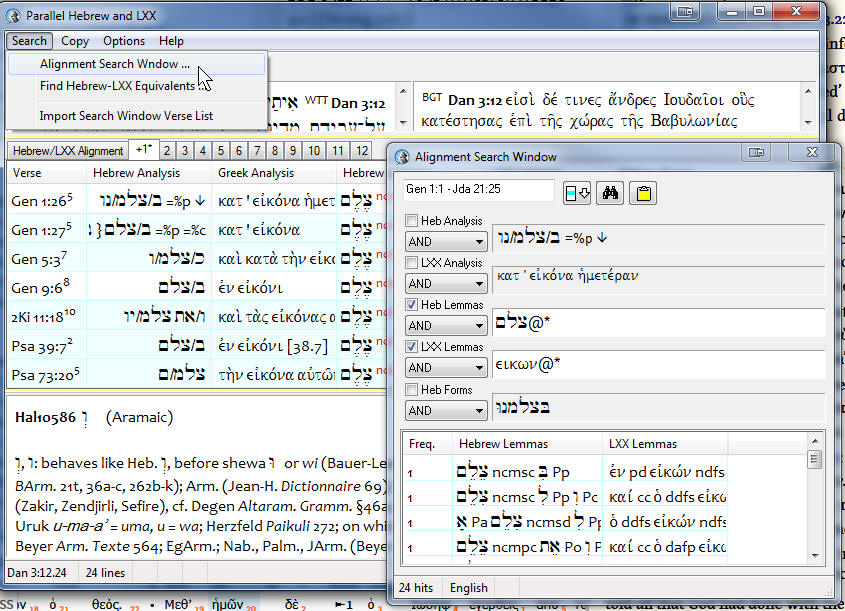
  3. SO, HERE IS THE BEST SOLUTION! Click on the line with the words you are interested in, and then click on the bigger binoculars in Tov, and the Alignment Search Window will appear. Now you can search according to particular Forms or Analysis or Lemmas. For the specific question we were asking, I did a little editing of the fields so that my search looked like this. (Note which boxes I checked.)

    The search takes a bit longer, but it gives exactly the results I want. I can also easily select all my results, send them to the main BW search window, and then generate a list of verses I want: Gen 1:26, 27; 5:3; 9:6; 2Ki 11:18; Psa 39:7; 73:20; Eze 7:20; 16:17; 23:14; Dan 2:31, 31, 34, 35; 3:1, 2, 3, 5, 7, 10, 12, 14, 15, 18.
    Note that this is also the better way to generate all the instances of Hebrew>Greek or Greek<Hebrew. Unfortunately, I don't see any easy way of extracting and synthesizing the results to get the numbers of times a Hebrew word is being translated by particular Greek words.
So, to summarize how BibleWorks does for this kind of work:
  • CONS:
    • There is no visual link of Hebrew, Greek, and English in the normal display mode.
    • There is not easy way to extract a count of how a Hebrew word is rendered by Greek words or a count of what Hebrew words are being translated by a Greek word.
  • PROS:
    • BW offers a number of ways of working with the texts.
    • BW's implementation of Tov's parallel Hebrew and Greek is notable for its morphological tagging which allows for powerful searching capabilities.
    • It's easy to generate lists of verses that match search criteria.
Let me know if I've missed something! In the next post, I will show what Logos is capable of doing.

Monday, July 8, 2013

Laridian PocketBible for Mac OS Kickstarter

I'm not a Mac user, and I can't keep up with all the Mac developments in the biblical software area, but Laridian does fine work, and Craig Rairdin is a good person... so, if you're interested help them get this kickstarted!

Sunday, July 7, 2013

Choosing a Bible Atlas - Part 2 - Advice?

In a previous post, I laid a background for my quest for a Bible atlas to use in a class I will be teaching, "Survey of the Lands of the Bible." I have surveyed many atlases, and there is a rather lengthy collection of my summary reviews on this page.

Again, my perspective is not an expert one, reflects my personal preferences, and is oriented to selecting a core textbook for my class. If you don't want to go through the long listing linked above, I have condensed all my work down to my "Top Ten (Eleven) Recommended Bible Atlases."

I'm still trying to choose, however, the best book for my class. From that top ten list, three rose to the top for my purposes:
The Moody and Zondervan atlases are somewhat similar, and I have a preference for the Moody. (Additional bonus: The Moody Atlas is included in BibleWorks9 which many of my students already own.) So, I really am trying to choose between the Crossway and Moody atlases.

I would really appreciate hearing from people who have classroom experience (either as teacher or student) with either of those atlases. Please leave a comment! I have read Phillip Long's helpful conclusions, but he is a bit torn between the Crossway and Moody as well.

Thanks for any insight or experience you can provide.

Saturday, July 6, 2013

High-Resolution Maps of Science... with Religion at the Center!

Be sure to enlarge the network map. 
PLOS ONE: Clickstream Data Yields High-Resolution Maps of Science


According to the above mentioned methodology we constructed a map of science that visualizes the relationships between journals according to user clickstreams. We first discuss the visual structure of the map, and then attempt to validate the structural features of its underlying clickstream model by comparing the latter to journal centrality rankings and an alternative model of journal relations derived from classification data.
 Interesting to see how the sciences are related... with Religion in the middle!

Thursday, July 4, 2013

Choosing a Bible Atlas

In preparation for a trip I am leading to Israel, Palestine, and Jordan in January 2014, I decided to offer a "Survey of the Lands of the Bible" course to help prepare students. To give you a sense of what I envisioned the course to include, here is the rationale I wrote in order to get course approval.
A better understanding of the Bible is enhanced by a better understanding of the larger scope of the history, geography, and other practical realities of the lands in which it was written and its events occurred. This course will provide a survey of the lands of the Bible and consider topics such as biblical geography, topology, culture, climate, flora and fauna, travel routes, archaeology and the like. It will benefit both readers of the text and visitors to the biblical lands. It will increase understanding both of the biblical world and of the realities in those lands today.
I plan to make use of a variety of resources available in Bible software programs, web sites like BiblePlaces and BibleWalks, and a tool like Google Earth. Still, I'd like to have a common core textbook, and the scope I want to cover would generally be shared by any good Bible Atlas. I don't have particular expertise in biblical geography, but how hard could it be to select a good Bible Atlas for my class? As it turns out, it's been a very hard task.

First, I discovered that there are MANY Bible Atlases available. I thinned the list somewhat by simply looking for ones that have been published or revised within the last 10 years or so and are still in print. That still left me with over 15 ones to check over.

So, I composed some parameters for evaluating atlases. It's long enough that I will point you to a separate web page HERE. To summarize all that, I looked at the following:
  • Approach: Is it intended as a reference book (like a Bible dictionary) or as a full-blown introduction and overview of biblical geography and related history?
  • General Matters: Quality, contents, and cost! I'm looking for books that have value for the students beyond the class I'm teaching. (One significant consideration is whether it is a book they will take with them--as a book or as a digital version--as they travel.)
  • Scope: Is it strictly focused on the Bible (and thus ends in the 1st century CE) or on the lands of the Bible (and may extend its interest to the modern day)?
  • Perspective: This turns out to be a critical factor. The extremes are represented by a) those who start with the Bible texts and use it to interpret all other archaeological and historical data and b) those who start with the data and largely disregard the Bible as mythical or theologically motivated history. I, with many others, am somewhere in the middle. I do not need archaeology to prove anything in the Bible. I do not understand the Bible to be focused on relating history and science, but I think it is a historical resource that should be considered and included with all the other information available when it comes to creating an 'objective' history. I list a number of examples I used to determine perspective.
In the next post, I will provide a summary of contents and a brief assessment of all the atlases I considered. In the meantime, you can check the comparative reviews of Bible atlases by Bolen (Carta, Moody, Zondervan, Satellite, and many other resources), Notley (Biblical World, Biblica, Aerial Atlas, IVP Atlas), and Long (Moody, Zondervan, ESV, IVP).
Part 2 now posted HERE.

Wednesday, June 26, 2013

The Megalithic Portal - Prehistoric and Ancient Sites for Google Earth

I just discovered The Megalithic Portal through the Google Earth blog. It's an independent, volunteer-driven site organized by Andy Burnham. He started a database of ancient sites in 1997 and got things online in 2001. He now has a compilation of more than 25,000 prehistoric and ancient sites from all over the world. You can start by looking for sites using a clickable map of the world, or you could run a search on the site and find, e.g., Ancient Temples in Israel, of which one would be the Chalcolithic Temple at En Gedi.

Perhaps a better way would be to download a KMZ file that can be used in Google Earth. On the Google Earth Community Group (get the KMZ file from there), Burnham says of the KMZ file:
It is a compilation of the 25000+ locations we have listed on the Megalithic Portal. Each entry includes summary descriptions and a thumbnail image, where available. 
The links do provide good information and multiple pictures where available. The sites are organized according to what they are in 50+ categories: temple, palace, tomb, mound, cave, pyramid, etc.


In terms of sites connected with the Bible, it's a mixed bag, but this is an ongoing work, and users can add their own sites and pictures. E.g., in the screen shot of west-central Turkey above, there are some links for Ephesus, Miletus, Sardis, Smyrna, Laodicea..., but not for Philadelphia or Colossae. In Greece, you can Philippi and Corinth but not Thessalonika.

In any case, it's worth getting the KMZ file and adding the web site to your list of resources.

Thursday, May 9, 2013

Liddell-Scott-Jones (LSJ) in Wiki

We have been fortunate for some time now to have the Liddell, Scott, Jones Ancient Greek Lexicon (LSJ) available on the Perseus site. It has now been rendered as a wiki on the LSJ Ancient Greek - English Dictionary site. Here's what they say:
The Liddell, Scott, Jones Ancient Greek Lexicon (LSJ) is perhaps the best known Ancient Greek-English dictionary. Here you can find a wiki implementation.The wikification of LSJ was no mean task but we hope that the extra features provided by the wiki set-up will enhance the user experience. Some of these features (like the indexes) were made possible through the use of Semantic Mediawiki extensions.
Different types of transliterations and word forms were used, so that everyone is happy: Ancient Greek scholars, speakers of Modern Greek, people who prefer transliterated Greek or Beta Code. For example, you will get results on the search box no matter whether you type in polytonic Greek, monotonic Greek, Greek without any accents at all, or transliterated Greek.
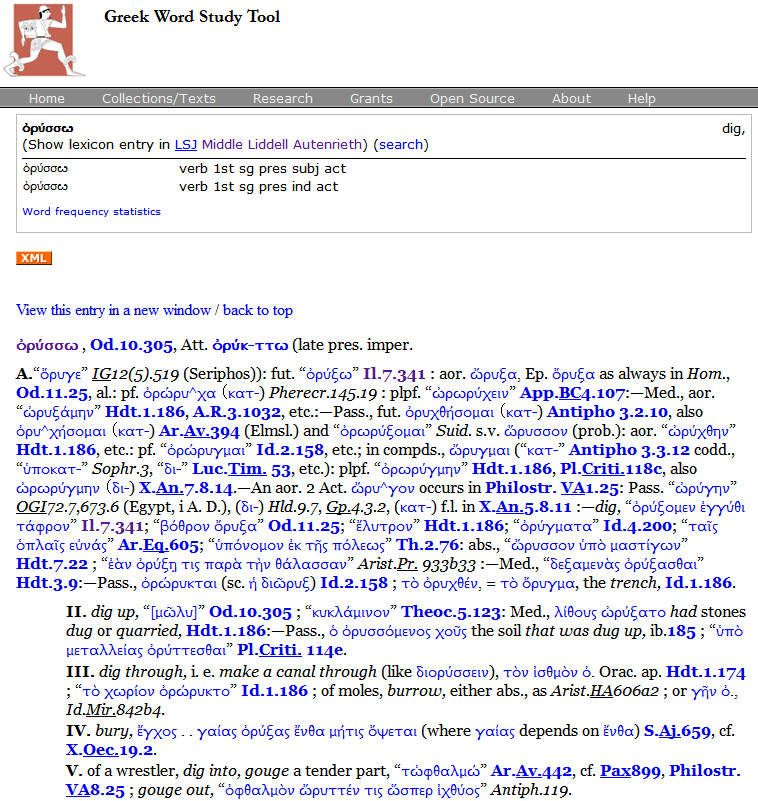
There are advantages to both sites. Below are screen captures (and links to actual pages) for the entry for ὀρύσσω.

The Perseus site can be a bit slow at times, but it does supply links to all the classical texts referenced in a definition.
Click HERE for actual page

The new wiki implementation has more flexibility in typing search terms, returns results more quickly, and displays the English glosses more noticeably. It also allows you to add a search form on your web site or a quick search link on your browser.
Click HERE for actual page

Give it a try, and if you're willing and able, you can apply to help improve the wiki.
[HT: Greek Language and Linguistics]

Saturday, March 16, 2013

How to Train Your Franken-Bible by Stephen Smith

That title ought to get your interest, and it is the title of a talk that Stephen Smith gave at the BibleTech 2013 conference. Smith has been doing all sorts of interesting and very helpful work on his OpenBible.info site. (It is worth your time to check that site, especially the Bible Geocoding resource.) He has posted an outline of his talk on his blog HERE. It's rather lengthy, but it includes both his slides and speaking points, and you can scan through it fairly quickly.

He discusses the disruption that ebooks have caused in the publishing world and looks ahead to see what implications this has for Bible translations. Quoting the BibleTech 2013 conference description:
This talk explores the viability of using machine learning and other math-filled buzzwords to computationally derive an English translation of the Bible. While automated processes often produce nonsensical or uncanny-valley-style translations that are just wrong enough to be unnerving, do we have enough linguistic and semantic Bible data to produce a reasonable-quality automated translation of the Bible? And if so, what could such a translation and process look like?
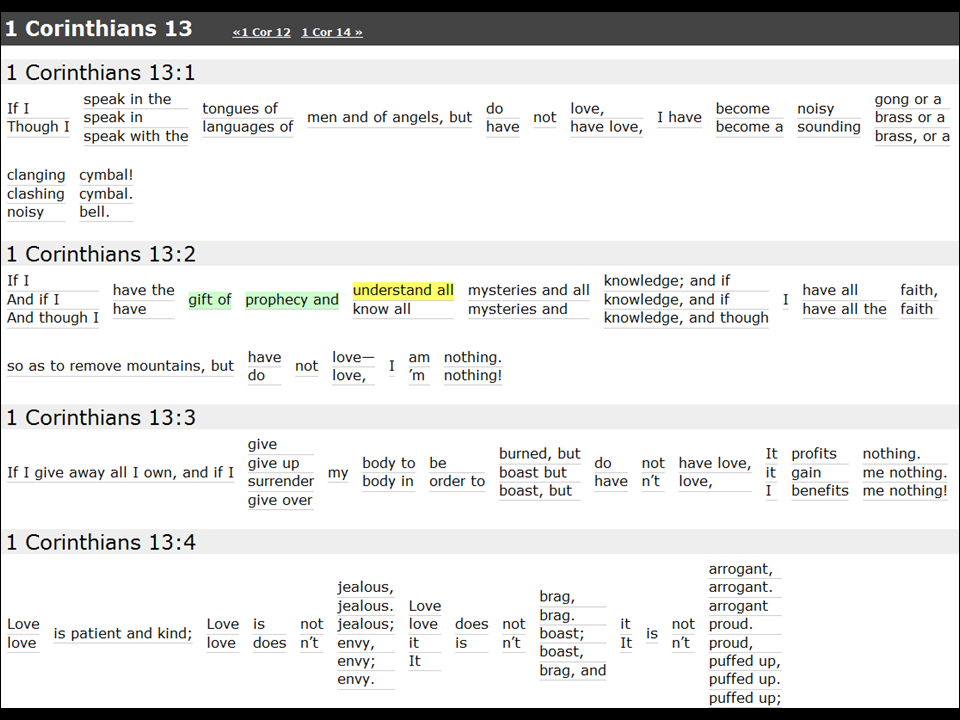
Using readily available technologies such as WordNet, Smith shows what something like this might look like at his Adaptive Bible website. As you can see in the slide below, for users, it's a matter of clicking through on various options of words/phrases in a verse that have been collected from a variety of English versions. (Choices made are in green. Probable next options in yellow.)
Smith is well aware of the dangers of such an approach to Bible translation. As he concludes:
  • What I’ve just described is one pretty basic approach to what I think is inevitable: the explosion of translations into Franken-Bibles as technology gets better. In the future, we won’t be talking about particular translations anymore but rather about trust networks.
  • To be clear, I’m not saying that I think this development is a particularly great one for the church, and it’s definitely not good for existing Bible translations. But I do think it’s only a matter of time until Franken-Bibles arrive. At first they’ll be unwieldy and ridiculously bad, but over time they’ll adapt, improve, and will need to be taken seriously.
I'll add two comments of my own:
  • This approach is a bit different because it starts with English versions, not the Greek original. I suppose this would get one closer to natural English more quickly, and Smith did note one by-product of what he was doing for creating semantic ranges of a particular Strong's number entry using WordNet.
  • I'm also thinking that machine language translation tools will improve and become specialized so that eventually we will have the capability of translating from Koine (not modern) Greek into English. I also imagine that you would be able to create that translation and specify parameters regarding how literal/dynamic it is and reading level of the generated text.
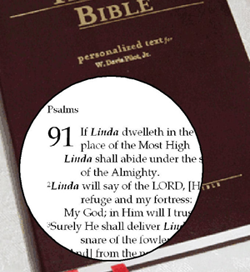
Finally... the marketers are already ahead of the game. Right now, you can get your own Personal Promise Bible! (I'm intentionally not providing the link.) Type in your name, choose a version (for English, I could choose "English Identity for Men"),and a Bible will be printed with your name in place of all relevant pronouns. So, for example, Matthew 5.13f now reads, "Mark is the salt of the earth... Mark is the light of the world." Now you know.

Friday, March 8, 2013

Cyber-Archaeology in Petra

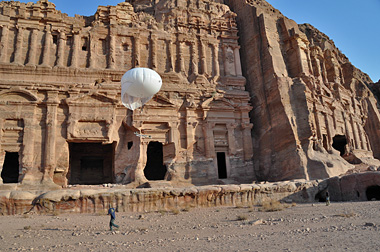
I've previously drawn attention to cyber-archaeology, and here's another interesting application of it in Petra published at the online Antiquity site. It's interesting stuff they are doing with "balloon-based high-definition photography, LiDAR (Light Detection and Ranging laser) scanning, Structure for Motion (SfM) photography to generate point cloud data to complement LiDAR, and AR (Augmented Reality) applications for enhanced virtual tourism."

The 2012 Petra Cyber-Archaeology Cultural Conservation Expedition: Temple of the Winged Lions and environs, Jordan

Saturday, January 26, 2013

Picture Taking Tips on Biblical Site Tours - Part 2

In the previous post, I expanded on some of the excellent points about picture taking made by Charles Savelle. In this post, I'll add a few additional observations of my own that arise more from my experience than because of my expertise.

What kind of camera should I use? You may already have a camera you like, but if you don't, here are some things to consider.
  • Today's compact point-and-shoot cameras are incredibly capable. They really can do just about everything and take very good quality pictures. Probably a key factor in your decision initially will be price. You will pretty much get what you are willing to pay for. I wouldn't worry so much about the number of megapixels. Pretty much any camera with 12mp or more is going to be fine. Another key factor is size of the camera. Do you want one that is very compact and pocketable but sacrifices a few features? Or are you willing to get a somewhat larger camera? If so, the main thing you will gain is zooming capability. Most point-and-shoot cameras start with 24-28mm at their wide end. (Ranges are usually measured in terms of their 35mm film equivalent, and at the wide end, the lower the number the better.) I think most people would be satisfied with a camera that has 5-7x zoom, but 10x or more zoom will give you more options. I doubt that you will need the 50x zoom some of today's cameras are capable of, but they are available. One other factor that is important to me is having a camera with a viewfinder. I find it hard to hold the camera in front of me to shoot, and it can be really hard to see the screen in bright light. HERE are some point-and-shoot cameras to check that have viewfinders. My daughter went on a mission trip to Africa this past summer, and she got excellent pictures from a Panasonic Lumix FZ47 12.1Mp camera with 24x zoom. Check reviews on Amazon or a site like DPReview to get more info on cameras you are considering.
  • UPDATE 2016.11: The camera market has changed considerably in 3 years. I now recommend that you start with this Digital Photography Review Buying Guide to start finding the best camera for you. I now use a Pentax K-30 with a Pentax 18-135mm lens, and this combination has the benefit of being weather-resistant. I.e., I can shoot in the rain and snow.
  • Given the quality you can get with a point-and-shoot, what's the advantage of getting a larger DSLR camera for which you use interchangeable lenses? First, you should be able to get higher quality photos simply from the technology used. In particular, a DSLR should be able to do much better in low light situations, especially if you save your pics as RAW rather than just JPEGs. Second, you can be more particular about the kinds of pictures and how you want them to look because you are able to use a lens that is best suited for a particular type of photo. Of course this all means more money and more equipment and more weight to carry around. Personally I use a Pentax K-x which is one of the smaller, entry-level DSLRs (now discontinued and replaced with the K-30). From my experience, I've ended up using a relatively light and simple kit that has an 18-135mm lens (27-202mm 35mm equiv) and a ultrawide angle 10-20mm (15-30mm 35mm equiv) lens. The 18-135 is used for 75% of my pics. For touring biblical sites and getting interior shots in close quarters, I've found that I've wanted a wider angle lens more than I've needed a longer telephoto. (I do often carry around a 55-300mm = 78-450mm equiv for telephoto needs.)
  • UPDATE 2016.11: I've also found that I needed a faster lens (i.e., a lower base f-stop number) to get pictures of artifacts in museums where--if pictures are allowed at all--flash is not allowed. My fastest lens is a 50mm f1.8, but that's a bit long for many indoors shots, so I've ended up using a 35mm f2.4. Money is the limitation on getting faster lenses.
  • UPDATE 2018.08: Photography equipment continues to evolve rapidly. Many smartphones these days have quite excellent cameras that will satisfy most needs. Mirrorless and Micro 4/3 cameras are much smaller than DSLRs, but they can match image quality.
Know your camera! Don't buy a DSLR just before you go and expect to get good pictures. Even with a point-and-shoot, however, you really need to have some practice with it and familiarize yourself with the camera's features. Check out all the modes that are available. Know the limitations of flash. If the camera allows for some manual selections know when and how to use them. One of the really handy features on many newer cameras is a panorama feature that allows you to scan across a scene, so know how to do it. (While handy, the result is a lower resolution photo. To get better quality, know how to take a sequence of shots and plan to stitch them together later using software.) Going to a different timezone, know how to change it.

What other gear do I need?
  • Unless you have a pocketable camera, spend some attention on a camera bag that you like and can use effectively. Do you want something hanging around your neck or shoulder or around your waist? Personally, I don't like a bag bouncing around at my front or side, so I prefer a waist-pack or a sling bag. The advantage of these is that you can swing them around to get at your gear and have both your hands free. 
  • As noted before, bring plenty of memory cards.
  • If your camera can accept it, a hood for the lens is very helpful. Another item to consider is a circular polarizing filter. There is usually lots of bright sun, and it will help to use these to cut down glare and flare.
  • Cleaning supplies: A small microfiber cloth will be handy to have, and a LensPen is also crucial. With an interchangeable lens system, bring along a rocket blower too. There's plenty of dust around to get in your camera.
  • Batteries and charger! Make sure you have a backup battery set. Also make sure that your charger will work on non-USA electrical systems and that you have the proper adapter to let you plug it in.
  • Tripod? It's a nice idea and is important for critical photography, but... I don't think you'll use it. For one, it does take up room in your luggage. (So, if you do get one, make sure it's one that folds down small enough to fit in your luggage.) Second, and more importantly, I don't think you'll have time to use it. When you are with a tour group, you are usually moving right along, and you just don't have to set up. (If you're traveling on your own schedule, then do consider bringing one.) As an option that I have used, consider instead bringing a monopod. They are lots easier to carry and faster/easier to use. They are especially useful if you have a long zoom and need some extra stability. Want something even more portable but still functional? Try a cheap, DIY string tripod!
  • Flash? Again, a nice idea, but I've just not been able to justify the weight and bulk. In most instances, if you need more than the built-in flash on your camera, you probably need to be serious about the lighting. Using an external flash takes some practice to get things right, so if you do bring one, know what you are doing. Workaround: I added a 'flashlight' app to my smartphone, and in smaller dark settings, it really helped.
  • Other stuff: If your camera is able to use a remote control, they are pretty small to bring along and may come in handy. I also put a bunch of business cards in my camera bag. They help identify my gear, but if I take pics of people, I can give them my card, and they can email me if they want me to send them the pic.
Practice photography etiquette.
  • If you are at a site and lots of people are trying to take a picture, take your picture and then get out of the way.
  • Be aware of when you can (or should) use flash. Many museums do not allow it.
  • Is your bright screen disruptive? Turn it off.
  • Does your camera make a noticeable sound when taking a picture? See if you can turn off beeps and such or don't shoot when it may disturb others.
  • Stay on the paths where requested. Don't be risking your life or endangering ancient artifacts by climbing up somewhere. In Israel, when the sign says to stay out because there are potentially landmines present, obey the sign!
  • If taking pictures featuring people, get their permission if it feels like you are taking a specific picture of them. Oftentimes it simply means holding up your camera, nodding, and saying, "Photo?" Remember that the people live there. They are not there simply for your viewing pleasure.
  • If you are with a group, stay with the group. As a tour leader, I'm always conscious of people who are wandering off or who are delaying the whole group while taking pictures. Don't be that person who is always the one the rest of the group is waiting for.
  • I have mixed feelings about taking pictures while the tour guide is speaking. On one hand, you want to be polite, so don't be disruptive and make a scene while the guide is speaking. On the other hand, you paid for this trip and are paying for the guide, and the guide is usually hurrying the group along, and you really want to get some pictures. The best thing is simply to use good sense and practice common courtesy.
Consider using video or audio comments. You may not think so at the time, but I guarantee you will take photos that later you will not remember taking and not have a clue why you took it. One way I've used to remember what pictures I've taken is to shoot a short video of the scene and describe what's there. Most cameras these days also have a video feature or else use your smartphone. Some cameras allow you to add audio attachments to a photo. Also, take pics of signage.

Consider using GPS. If you want to remember where you were when you took a picture, use GPS. Some cameras these days have GPS included and while include the location data directly with the photo. If your camera doesn't have that feature, you still have some options:
  • One option is to use and Eye-Fi Pro X2 SD card. They are rather more expensive than regular SD cards, and their geotagging depends on wi-fi network positioning, so it is not likely to work well in remote locations.
  • Your smartphone or tablet probably has GPS capability, or maybe you are a runner and have a GPS watch. You can use these devices and free software like Runkeeper or Endomondo to map the path you took while going through a site. (HERE is an example of how I used it.) Then you can use Google Maps or Google Earth to retrace your steps. With some sites, Google Street View will even let you walk through the site, and you can confirm your pics. Check this post.
  • Even better, if you have a GPS device, you can automate the process. Make sure the time on your camera and your GPS are the same. Track your path and save/export the GPS file (GPX or TPX file) it generates. Then use the free Geosetter program which allows you to synchronize the GPS data with the timestamps on your pictures and automatically apply the location data to the metadata of the image file.
  • If you offload your pictures to a computer, most image software (e.g.Google Photos, Lightroom) allows you to pinpoint the photo location on a map. Another good option is Geotagger or Geosetter.
Have a 'theme' for your trip. If you don't want your pictures to look just like everyone else's, consider adopting a theme for your trip. Maybe you want to be especially attentive to taking pictures of food or including cats in the picture. (There are plenty of free-range cats and dogs in Turkey/Greece/Israel/Jordan/Palestine!) Or maybe look for a particular color. How about the ornate capitals on all the columns you are going to see. Maybe bring along some little token like a stuffed animal and include it in your pictures. One of the benefits of having some kind of theme like this is that I've found it helps me see more. Instead of being overwhelmed with all there is to see, I find I see more when I'm looking for something in particular.

Try to practice photography and not just take pictures. This is harder to do and is moving from simply documenting a site to trying to capture the essence of the site. Is there a photographic opportunity you see that with one picture will help you recall the experience of that site? Can you find a scene that tells a story related to the situation? Be aware of the light and shadows and lines and patterns. Here's where you start thinking more like a photographer and an artist than simply as a tourist.

Relate your picture taking to your devotional practice. If you have some kind of morning devotion, use that Scripture to inspire you throughout the day. Where does that Word of God connect with what you are seeing. I'm not thinking so much literally: it's a passage about Paul in Ephesus so you take a picture of Ephesus. Think spiritually and abstractly! How is what you read experienced in what you are seeing.

Enough of me. Some other basic picture taking tips here. If you have other good suggestions, please comment!

Picture Taking Tips on Biblical Site Tours - Part 1


Charles Savelle at BibleX has posted an excellent series on Picture Taking Tips for the Holy Land, Part 1, Part 2, and Part 3. [HT: Todd Bolen at BiblePlaces] You will want to read his full posts, but I'll simply bullet-point them here, and add some additional comments of my own. I'm not a professional photographer either, but I've been working on improving my photography, and I've taken enough trips and photos to have opinions and thoughts on the matter!

  1. Take pictures of signage. This is really helpful.
  2. Look behind you as well as ahead of you. And look up and down and to the sides!
  3. Don’t be afraid of having people in the pictures. In addition to the points that Savelle makes, remember that your trip is not simply a biblical / archaeological tour. It is also a cultural experience. Sometimes people can be the point of the picture.
  4. Decide why you are taking pictures. This is one of the most important points Savelle makes. Are you really going to want to look at all those pictures of rocks and ruins again? Is anyone else going to want to see all your pictures? What do you want to do with your pictures when you get home? Are you simply 'documenting' the site?
  5. Study what others have done. Great advice. It's another way to think about why you are taking pictures. With so many great pictures available for free on the Internet (do always check copyrights, but many really are free), is your time well spent trying to get a picture of something for which there are already hundreds of pictures? Or are you better off just observing and experiencing the site and the moment? People who aren't worried about getting pictures usually are a bit more relaxed and able to enjoy the site more!
  6. Ask the tour guide for suggestions.
  7. Have your camera ready and not tucked in your backpack. Indeed! I'll mention it again in point 11 below, but when I wasn't carrying my camera around, I usually was carrying my smartphone and could use its camera.
  8. Don’t forget to think small. Holy Land trips are basically large-scale affairs. Also keep in mind that the Bible talks about birds and flowers and insects. You might want to include these in your portfolio of pics. And the food! And the colors!
  9. Take more rather than fewer pictures. Yes, but delete and edit before you share them with others! I also recommend taking your pictures at the highest quality your camera allows. Yes, each photo will take up more space as a larger file, and thus you will need more memory cards, but it will be worth it. If you are really serious about photography, you probably know that you should be shooting RAW.
  10. Download and review your photos each night on a computer (if you bring one). This is hard to do when you are tired and have a busy schedule, but it is important. Savelle actually is talking about offloading pics from your memory card (in order to free space on it), but I think you are better off just downloading and leaving pics on the card. This way you will have a backup of your pictures if something should happen to the camera, the card, or your computer. Memory cards have become relatively inexpensive, so you really are better off just buying plenty of memory cards.
    Another option to consider is uploading your photos nightly to an online storage service like DropBox, SugarSync, Google Drive, or Windows SkyDrive. Of course using this option means that you are counting on having regular access to the web and the time to upload a few hundred megabytes of pictures each day.
    How much memory do you need? I probably take more pics than the average visitor, and on a two-week trip to sites in Turkey and Greece, using a DSLR 12Mp camera whose JPEG pictures were each about 5-6Mb in size, I took about 1800 pictures. (I.e., I averaged a little over 100 pics each day.) Total space used was less than 10Gb. A four-week trip in Israel ended up with over 3500 pics and less than 19Gb storage. [2016.11 UPDATE: I'm now using a better camera and shooting RAW pics. These are about 14MB/pic, so I'll be bringing more SD cards, but really my 64GB should be sufficient.] If you are able to back up your photos each day, you should consider just getting a 16Gb or 32Gb or 64Gb card and being able to keep all your photos for the whole trip on one card. If you won't be able to back up your photos, I'd recommend getting multiple 4Gb or 8Gb cards. That way, if something should happen to the camera or the card, you will at least have some photos still saved.
  11. Consider what you will do if your camera breaks on the trip. Yes, it happens. I have two backup plans. 1) I bring along my old 7Mp compact point-and-shoot which still does a serviceable job. 2) I don't use my smartphone for calling, but I can use the camera or video in a pinch.[2016.11 UPDATE: Smartphone cameras have really improved. They are also able to do all sorts of other clever things including easy panorama shots. I do bring a second camera body, but I also now do this because I have my walk around lens on the primary camera and a ultra wide angle lens on the other. I found that if I couldn't get the shot I wanted with my 18-135mm lens {27-207mm 35mm equivalent}, it was usually because I needed wider. When going with a tour group, one just doesn't have time to keep switching lenses.]
In my next post, I'll add some additional points of my own.

Thursday, January 17, 2013

Touring Israel in Google Street View


As reported in the Google Earth Blog,
Google has rolled out a rather substantial Street View update this morning, covering hundreds of towns in Israel and updating various other cities across the world. Some of the highlights include the Sea of Galilee, the Western Wall and the Bet She'an National Park
In the graphic at the top, all the blue lines show where Google Street View is available. (The blue dots are links to photographs.) Lots of touring in Jerusalem and along the western part of the country, but do note that you can take a nice trip down along the Dead Sea and catch glimpses of Qumran and Masada as you go. They even drove into Ein Gedi. If you click on the Bet She'an link in their blurb, you'll see that they walked around the site and looks like this:
They also went up to the top of the Arbel and walked around there as well. (click on the link to see for yourself)

You can get a view of the archaeological work at Magdala.

They didn't go along the north or eastern shore of the Sea of Galilee, so no view of Capernaum (except for a little detour into the resort next to the Greek Orthodox holdings in Capernaum).

They did take a complete and thorough tour of Chorazin, however. Check out the synagogue there. There is also a very nice tour of ancient Tell Dan, including the Israelite gate complex,the middle Bronze arched gate, and the sacred high place. There is also a complete tour of Tell Hazor. Be sure to visit the palace. And the Herodian amphitheater at Caesarea. The well at the gate of Tel Ber Sheva. The lovely bell caves at Beit Guvrin / Maresha.

Okay, you get the idea. This really is spectacular. If you find some other favorite Google Street View archaeological sites, please add them in the comments.

Monday, January 14, 2013

Free eBook: Cyber-Archaeology in the Holy Land - The Future of the Past


Bible History Daily, a publication of the Biblical Archaeological Society, announced today a free eBook available for download entitled, "Cyber-Archaeology in the Holy Land - The Future of the Past." You will need to sign up for a free account--it's BAS's way of promotion--but the 29-page eBook is indeed free and downloadable as a PDF.
In this free eBook, pioneering researchers at the University of California, San Diego’s Calit2 laboratory showcase cutting-edge archaeological methods that are helping create a new and objective future of the past.

By Thomas E. Levy, Neil G. Smith, Mohammad Najjar, Thomas A. DeFanti, Albert Yu-Min Lin and Falko Kuester

It's pretty amazing the technology that is available today for archaeological research, from LiDAR to octocopters, HD and 3D, OpenDig metadata databases and crowd-sourcing. (Click on the graphic above to be able to read the Table of Contents more easily.)

Friday, January 4, 2013

Biblical Studies and Technological Tools - Review of 2012 and looking ahead to 2013

I had been neglecting this blog a bit in 2011 and the start of 2012, but I had some time to revive it this fall. As a result, traffic to the site did increase by 18% in 2012 as compared to 2011. All told, in 2012 there were 38,459 unique visitors to the site and 74,0171 pageviews. As you would expect, the majority of visitors are from English speaking countries: USA, UK, Canada, Australia. After that, about 1% of the total visitors come from each of the following countries: Philippines, Brazil, Germany, India, Japan, Italy, Israel.
  • By far the most read post in 2012 (9373 pageviews) was actually one I posted in 2011: Evaluation of Android Bible Apps. Other than the home page, the second and third most visited pages were also from 2011: Bible Software for Android (3750 pageviews) and MySword Bible App for Android. Clearly there is a strong interest in Android Bible apps. I will have to update my reviews. I did post in 2012 about the Relative Speed of Android Bible Apps and the Versions Available in Android Bible Apps. I'm still standing by the observations I made in those posts. I'm using MySword most often because it is the fastest one to come up on my aging Droid X, it has the Greek versions I usually want to read, and it allows for the display of multiple versions. If I want to see a bunch of English versions, I use YouVersion. If I need to do more in-depth work, I will go to Olive Tree or Logos or use a web browser and go to Biblia.com (Logos) or the online NET Bible.
  • The most read post from 2012 was the Logos 5 Review - Part 1 with 1827 hits. (Part 2 and Part 3 of my review only received about 800 hits each even though that third part has my concluding observations.) The release of Logos 5 was one of the bigger items of interest in 2012.
  • The second most read post was Bible Software Decisions: Accordance, BibleWorks, Logos, et al. There certainly is competition between the Bible software offerings, and when it becomes an investment of many hundreds of dollars, people do want to know what they are getting for their money.
Some news of note in 2012 in this little niche of interest in Bible and technology:
Looking ahead to 2013...
  • I am very interested to see what becomes of Windows8. I posted some of my first impressions of using it, and they are definitely mixed impressions. On my home desktop machine, I have the option of upgrading from Win7 to Win8, but I have decided not to do so for the time being. Win8 really is designed as a touch-screen system. To maintain usability with desktop users, Microsoft made some concessions for a classic desktop interface. To me, then, Win8 feels like neither fish nor fowl. I do like the idea of having a similar interface for all my devices, but I'm not sure how that will work out.
  • In a related matter, I'm also wondering how Android will proceed. It's not without faults, but I have had great functionality on my Droid X phone which has basically become my do-everything device: phone, contacts, email, web, GPS, photo, Bible software, games... The question for me still is what I will do when my Droid X phone will need to be replaced, probably later this year. Do I go with Android or Win8? I'm not sure.
  • It seems clear to me that the market is breaking into Win8, Android, and the Mac OSes. (I tried to keep abreast of developments in all three, but it is too much. I hope to do what I can with Windows and Android.) The question really becomes, what is the future of the desktop and notebook? My daughter wants a tablet, and it appears to me that manufacturers are trying to address this desire. I like the idea of, say, a 10" tablet that I can take everywhere and is able to run all the programs/apps I want. For me, this is probably going to take the form of a Win8 tablet. BUT, I really like lots of viewable screen. (I'm working with two 21" widescreen monitors right now.) Does this mean a tablet with a desktop docking station? Will the tablets really have enough power to run everything, including the photo editing I do? How about an ultrabook and a docking station with multiple monitors? I suspect that I am now old-fashioned for still liking a desktop.
  • I will be watching for developments in the online social aspects of doing Bible study. Logos has been promoting Faithlife which has interesting potential. In addition to the online component, it also has ways of hooking in to the Logos software on your computer for sharing notes, searches, etc. YouVersion has a similar kind of integration for their online Bible reading as well as their mobile apps. BibleX is their latest approach to communal Bible reading. There are also a number of ways to read the Bible together on Facebook. I'd love to see this kind of approach become a truly global community of readers, and it could be both groups of Christians as well as interfaith groups.